There’s nothing finer than taking home a brand new set of arrows. The shafts are clean. The fletchings are crisp and pristine. They’re visions of beauty.Spend a couple weeks on the range with those arrows, though, and they might not look so pure. They can take a beating, and get damaged. Learn a few simple repair tricks, and you can keep those arrows flying for a long time.
FLETCHINGAt some point, whether you shoot arrows fletched with feathers or vanes, you’re going to either lose a fletching, or one or more is going to be damaged and need to be replaced.
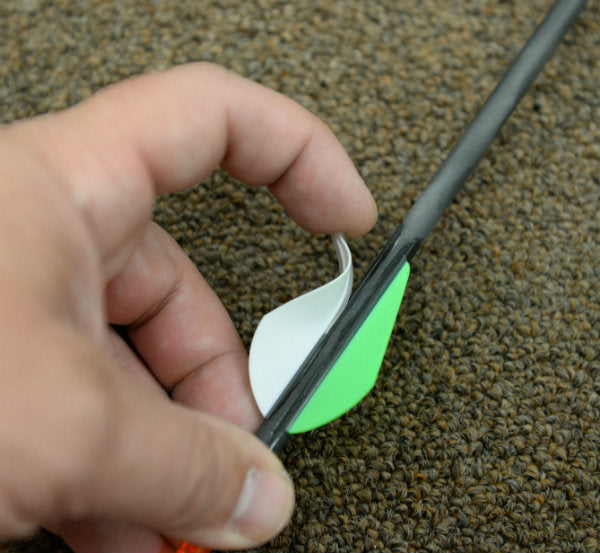
Of course, you can take such arrows to your local pro shop, and they’ll take care of them for you. But with a fletching jig of your own, this is an easy fix you can do at home.Let’s say you take a shot with an arrow, and one fletching flies off or partially separates from the shaft. Some archers like to take such an arrow, strip off the remaining fletchings, and put three or four new ones on. Nothing wrong with that. And, in fact, if your nocks are glued in place, this is the easiest solution. Otherwise, you’ll have to cut off your nock, put a new one on without gluing it, and then follow the steps below.With movable nocks, you can replace only the missing fletching. Use a stripping tool to remove any remaining vane material and glue. With carbon arrows, be careful not to gouge the shaft with the tool. You only want to remove extraneous surface material.

When finished, the shaft should feel smooth where the fletching had been. Wipe the spot with a lacquer thinner to remove any remaining glue, followed by 100 percent denatured alcohol – 91 percent isopropyl works too.Place your arrow in the fletching jig and spin the shaft, while holding the nock in place, until you line up one of the remaining fletchings in the spot it would be if you had just glued it in place in the jig. Now turn the arrow rotation dial one click toward the missing-fletching section. When it stops, you should be in the right spot to glue on a new fletching.Clamp a new fletching in place without any glue on it to see if the spacing between it and the adjacent fletchings looks equal. Also check the distance between the nock and fletching to make sure the new one will match the others. If everything lines up, you’re ready to glue.

(If you’re using a jig that clamps all of your fletchings in place at one time, simply line up the remaining fletchings in the jig and glue the missing one using the empty slot.)Those of you shooting the curly tape-on vanes can put your arrow in a jig like you’re going to fletch it. Using a pen, mark the spot where the replacement vane should go, then install the vane by hand.Or you can use one of the tools specially designed to help line up these vanes. There’s the Beiter Tri-Liner Tool and the Spigarelli Spin Wing Fletcher. Both allow you to mark the shafts where you want to install the curly vanes.
 CRACKS
It’s a good idea to get in the habit of checking your arrows for cracks. This can be done by visually looking over the shaft or slightly flexing an all carbon shaft. If your arrow is cracked, there’s nothing you can do to save it in its present condition. Cracks compromise the structural integrity of an arrow.

Assuming the crack is confined to the end(s) of the shaft, you can cut off the shaft at least 1 inch beyond the end of the crack. That arrow is likely too short for your use now, but maybe you can pass it on to someone with a shorter draw length.
BENDSCarbon arrows don’t bend, so here we’re talking strictly about aluminum, and – to some degree – aluminum/carbon combo shafts.Provided the bends aren’t sharp, aluminum and aluminum/carbon arrows often can be straightened. To do it right, you’re going to need an arrow straightener, such as the AAE Arrow Straightener or the Grayling Perfect Arrow Straightener.

With this tool, you can spin a shaft, and an indicator tracks high and low spots. Set the high spot under the indicator and press down on a lever that bends the shaft back into place. Some straighteners allow you to fix bends all the way out to the very ends of a shaft. Others will only work on bends more than about 4 inches from the ends.
NOCKSNocks crack and break frequently. It doesn’t take much of an impact to render them worthless. In most cases, all you have to do is pull them out and put a new one in place. Keep several with you at all times, and you’ll never be in a jam.Sometimes nocks break off down inside the shaft and there's nothing sticking out to grab onto with pliers. Pick up a drywall screw with a set of pliers, heat the pointed end and stick it down inside the shaft into the back of the broken nock. You should then be able to pull the nock remnants out.If your nocks are glued, you’re going to have to cut a damaged nock free. Remove all of the plastic bits from the shaft end before gluing on a replacement nock.Nocks can be prone to cracking from repeated use. As with checking your arrows for cracks, it’s also a good idea to check nocks periodically. If a nock no longer snaps on the string, it’s a good idea to replace it.
POINTSHit something hard inside a target, or strike a rock on a pass-through or miss, and you can easily flatten or bend an arrow point.With an aluminum arrow, you can heat the point to soften the glue holding it or its insert in place, and pull it out of the shaft.You can do the same with a carbon arrow, but you run the risk of making the end of the shaft brittle, due to the heat. Overheating a carbon arrow can damage it beyond repair. If you’ve got a glue-in point, hopefully you used a hot-melt glue. Just heat the tip and pull the point free with a set of pliers as quickly as possible, using as little heat as possible.
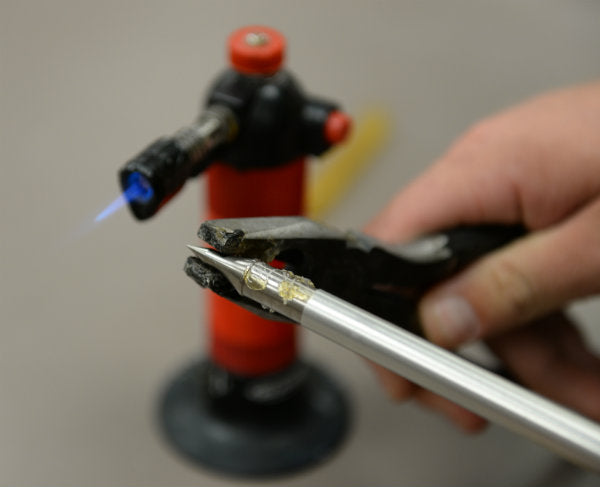
Sometimes points bend inside the screw-in inserts in a shaft, making it impossible to unscrew the point. Slide something relatively heavily inside the shaft from the nock end. (Drill bits work great for this.) Hold the arrow in your hand with the point-end in the air, and then whip the shaft downward, so the drill bit slams into the back of the insert. This should break it free from the glue.Be careful when you do this. That bit and insert can fly out of the shaft and injure you or someone standing nearby. So wear safety glasses to protect your eyes, and make sure no one else is in the room with you.Now you can glue in a new insert and install a new point.